Advanced Partition Managing in Partition Expert
Table of contents:
- Resize a volume without data loss
- Create a new volume when there are four primary partitions
- Delete a volume to create unallocated space? maybe there’s no need
- Change a volume’s drive letter to hide/unhide partition
- Erase or Format a volume to make data clean, or just Wipe a volume
- Data Wiper wipes everything
Windows default Disk Managing tool Disk Management has many features for us to check and operate disks and partitions, for basic usage, they’re enough, but we do have needs on some advanced features to make partition managing easier and safer, and ensure data intact at the same time.
Warlter from howtogeek wrote a very detailed guide on how to manage partitions without other software, he shared the following operations to manage a disk partition:
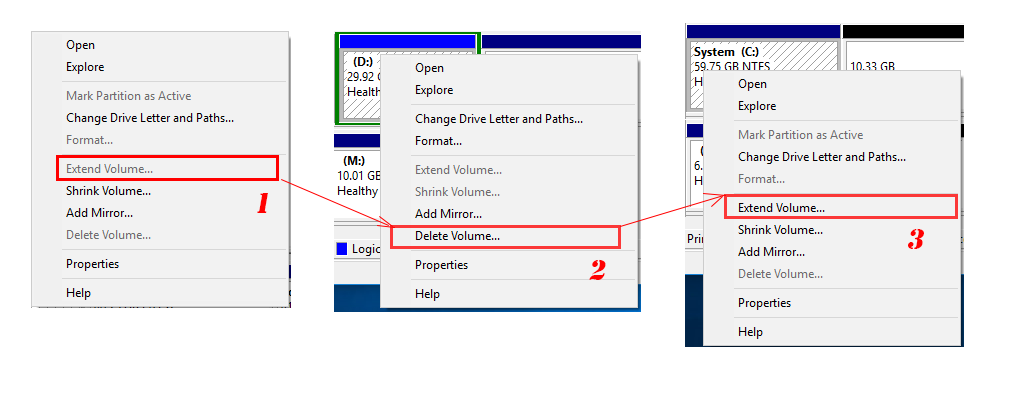
- Resize a volume
- Shrink a volume
- Extend a volume
- Create a new volume
- Delete a volume
- Change a volume’s drive letter
- Erase or Format a volume
These basic operations are quick enough to manage a new disk and Disk Management is absolutely the best program when dealing with such operations, you can follow along with this guide (the screenshots are also very clear) without the help of any other third-party partition programs, but we can dig into this guide and find out the advanced partition operations like this:
- Resize a volume without data loss
- Shrink a volume from the head position of a partition
- Extend a volume using free space from other partition
- Create a new volume when there’re four primary partition
- Delete a volume to create unallocated space? maybe there’s no need
- Change a volume’s drive letter to hide/unhide partition
- Erase or Format a volume to make data clean, or just Wipe a volume
To complete these specific operations, Disk Management is not the right option, a partition program will do the job. Try the portable partition program Macrorit Partition Expert, so we don’t have to install it to the system, run the 64-bit edition (or the 32-bit one, they’re in the same package ), and then we’ll good to do the advanced operations
Resize a volume without data loss
In most of the cases, C Drive is the partition always running out of space, or the partition we need to shrink to make more volumes, shrink a drive in Disk Management is OK when the page file has no issue, extend this volume, however, if we use the default method, will need unallocated space right after C Drive, which space we don’t regular have unless we delete the partition next to it and make unallocated space from it, that’s a way of losing data, of course, you can do a backup before deleting, but when the partition size is large and data in that volume is huge (Server side data, i.e.), it’s just not worthy to perform such step, so we’d like resize it without harming data in other volumes.
Shrink a volume from the head position of a partition
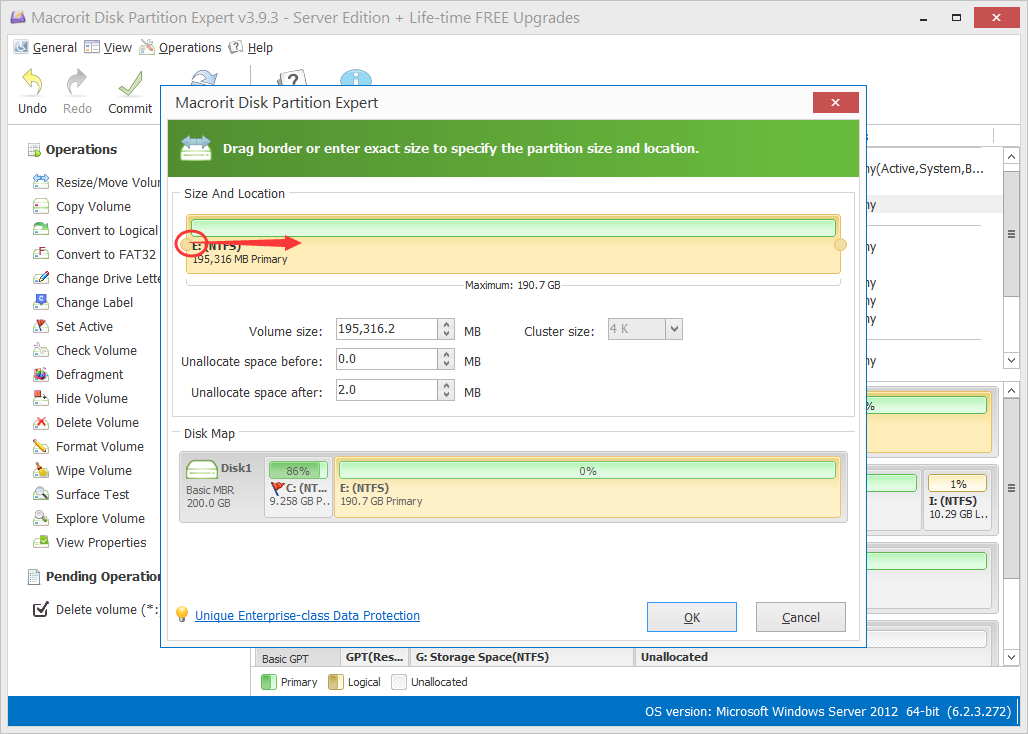
Disk Management only shrink a volume at the end of a drive, and shank space can only be to used to create a new volume or be used to extend a partition on a dynamic disk (from the Window 2000 era), if we want to shrink D Drive and use the free space to extend C Drive, we can’t perform that on a basic disk (widely used disk type), we can’t do it in Disk Management, we can do it in Partition Expert instead, it is able to shrink a partition from the head, steps may be as follow after running the program:
- In the main window check the disk map first and click on the partition with enough free space (take E Drive for instance)
- Choose Resize/Move Volume function from the side bar on the left
- In the opened resize window click on the left-side handler and drag it to the right, like the screenshot below (that’s how we shrink the head)
- click OK to close this window and you’ll see this step is added to the “Pending operation” area, on the bottom left side of the main window
- Click Commit to make this step run and you’ll get the unallocated space ahead of the partition you shrank
What’s the point of shrinking the head? why is it important?
In this way, we can directly extend a volume that is ahead of the partition we shrank, which is often useful when D Drive has much free space and C Drive is in low disk space warning, now that the unallocated space is next to C Drive, or the partition you’d like to extend, we can use the Extend Volume function in Disk Management without any problem (of course, you can extend a volume in Partition Expert too) if the file system of C Drive is NTFS
Apart from that, Partition Expert is able to make unallocated space from the very end of the disk to the very top, say we have a F Drive with very much free space in it, C, D, E Drives are all facing the low disk space problem, we can extend them with some free space from F, in Disk Management, we can’t do this unless we delete all the D, E, F partitions and extend C, create D, E, F again, the Shrink Volume of Disk Management has a direction limitation, it only shrink the end side (the position on the right), which means, unallocated space is created after the partition we shrank
In Partition Expert, every partition is movable, so unallocated space we created can travel between partitions, it can extend any one of them without damaging their existing data.
So shrink the head makes it possible of extending a partition that is on the left side of the partition we shrank
Extend a volume using free space from other partition
Now we have a partition shrank, unallocated space created, and moved it the right position, we can now extend a partition that has low disk space, we can do this operation in both Disk Management and Partition Expert, since we are still in Partition Expert, we’ll extend this volume here, with the following steps:
- Click on the low-disk-spaced partition, in this example, it’s C Drive
- Then click on the Resize/Move Volume function again
- Drag the handler on the right side to the very end of this bar and Click OK to close this window
- Click the Commit button from the top menu, and C Drive is extended
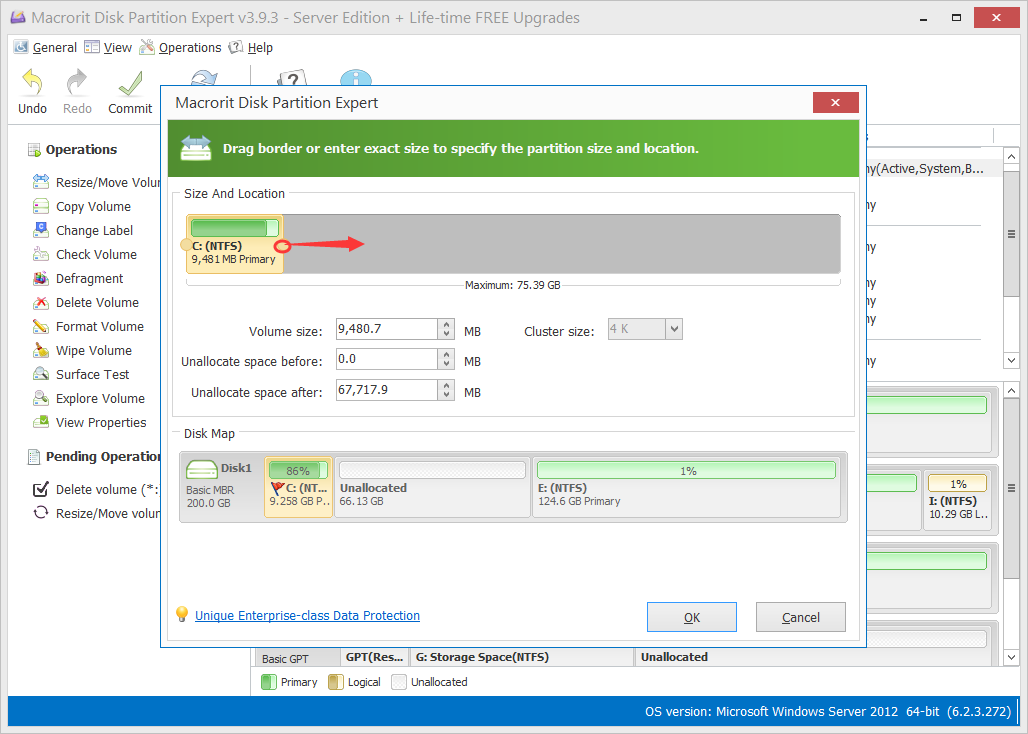
As for the step 3, you don’t have to drag the handler to very end, feel free to stop it at anywhere when “Unallocated space after” is enough in your plan, the rest of the unallocated space can be used to extend other volume or new volume creating
Extend a volume fast solution: Partition Extender
The system volume is always running out of space, being the case, we can just hire Partition Extender to make the extending easier, safer and faster.
In Partition Extender, we don’t have to shrink a volume and create unallocated space first, we simply extend C on first clicking, the follow steps explains how, BTW, Partition Extender is also portable, so we can run it from the portable package, choose 32-bit or 64-bit and run the following steps:
- Click C Drive and click Next
- Drag C Drive’s handle bar (on the right side) to the end
- Click OK and OK again to commit this operation
Then we have this volume extended
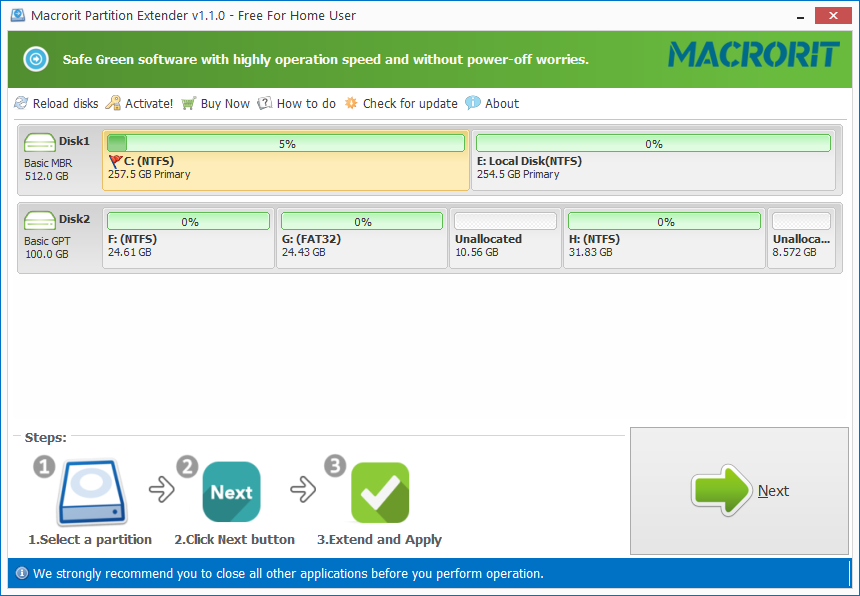
How does it work?
Partition Extender auto detects if there’s unallocated space on the disk, when you have it, Partition Extender will use it first and when you require more free space, it will shrink the neighbor partition and shrink it to minimum size if you keep extending (keep dragging the handle to the end); when there’s no unallocated space on the disk, Partition Extender will directly shrink the partition next to it and extend target partition at the same time.
Learn More About Partition Extender
Create a new volume when there are four primary partitions
We can’t create the fifth partition when there are already four primary partitions on the MBR disk unless we remove one partition and format it to a logical partition
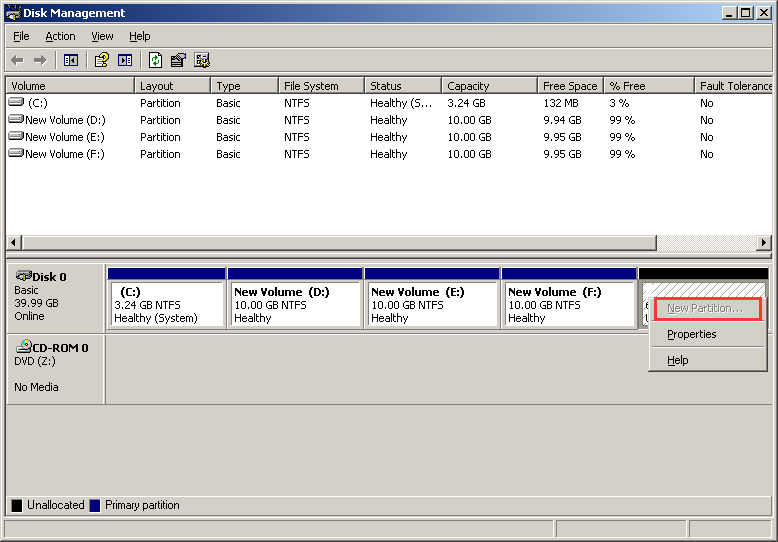
In Partition Expert, we don’t have to delete any partition, just do a conversion will solve this problem
Like the screenshot above, we have 4 partitions on the disk, this version of Disk Management doesn’t show the partition is primary or logical, new version ones (Windows 10) will display the property, or just open Partition Expert instead, we’ll show the detailed info (the screenshot below). Anyway, let’s fix this in Partition Expert like below:
- Click on the last partition on the disk
- Choose Convert to Logical and you’ll be prompted to confirm
- Click OK to pend this operation
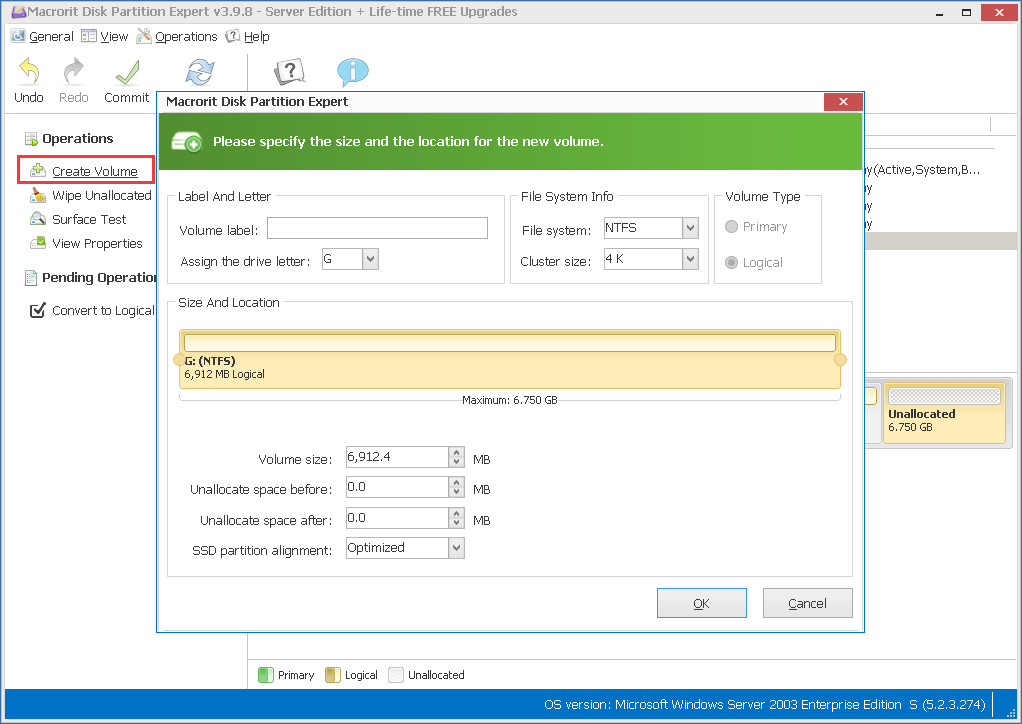
- Now shrink this volume using the method we mentioned above to create unallocated space
- Then click on the unallocated space and choose Create Volume
- Click OK to use the default/recommend settings and click Commit
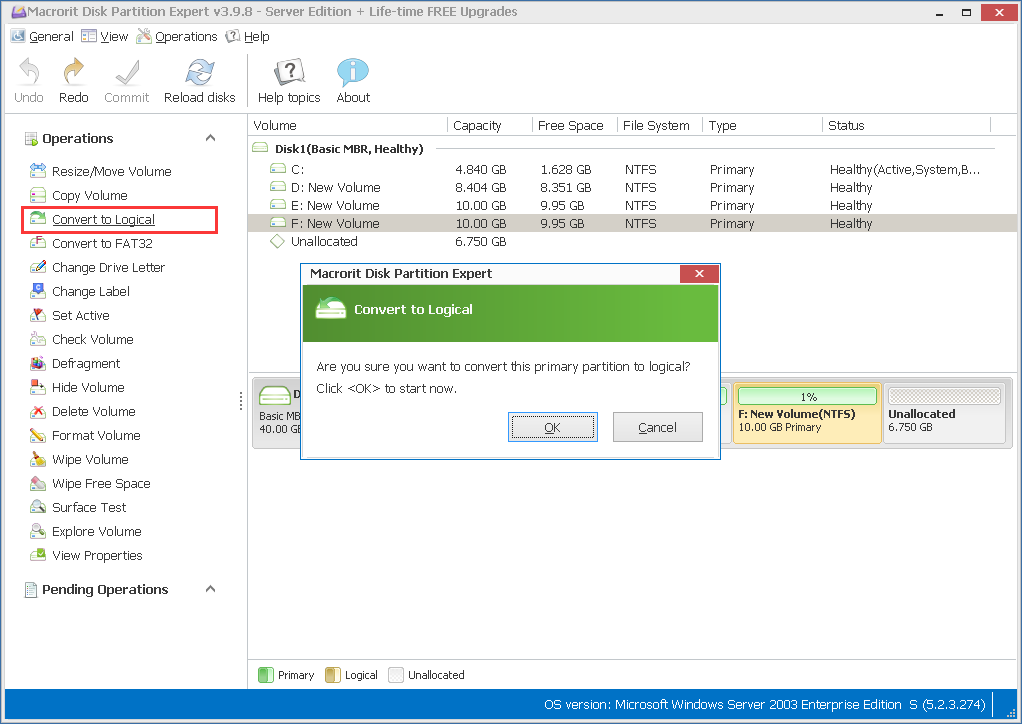
In this way, we created the fifth partition without deleting any previous partition, again, you don’t have to covert the last partition, feel free to choose any partition that’s in between, but it’s a convention to make the extended partition (where logical partitions live on) stays at the end of the disk
Delete a volume to create unallocated space? maybe there’s no need
There maybe two scenarios for us to delete a volume:
- Simply want to delete an extra partition and reallocate the space to other volume
- Other volume is running out of space, need to extend it with unallocated space from other partition, the only way of getting extensible unallocated space is to delete another volume
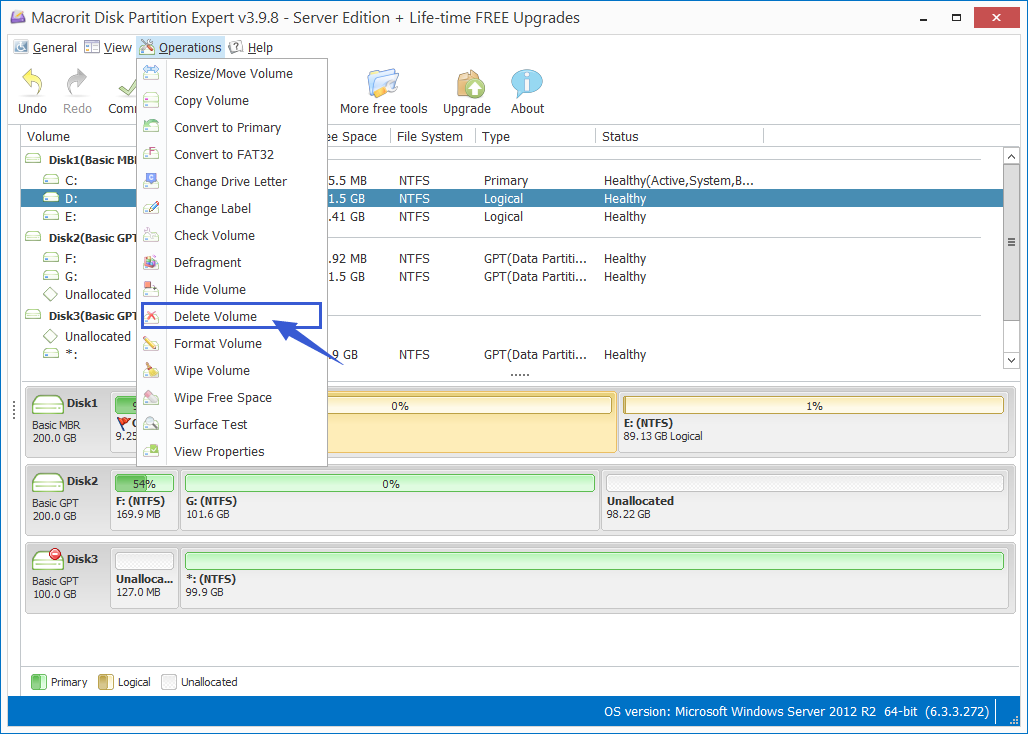
If it’s the first case, go ahead and delete it, in Partition Expert, we can do it like this:
- Click on the partition and choose Delete Volume
- Confirm to the warning message
- Click on the neighbor partition and use the Resize/Move Volume function to extend it
And click Commit to delete the volume first and then extend another volume, faster than Disk Management since we can create a volume within one window, don’t have to click NEXT for many times like in Disk Management
Change a volume’s drive letter to hide/unhide partition
Change Drive letter is a not often used function when creating a new volume, it will generate a new drive letter automatically. Two scenarios I can think of changing the drive letter are:
- Change (remove) a drive letter so File Explorer won’t list the drive
- Change Drive Letter in VMware when we need to make “D” Drive the real volume not the CD-ROM drive letter
As for case 1, in Partition Expert we can directly use the function Hide/Unhide Volume (no showing in the list at the same time, but a toggle function when the partition is hidden/shown)
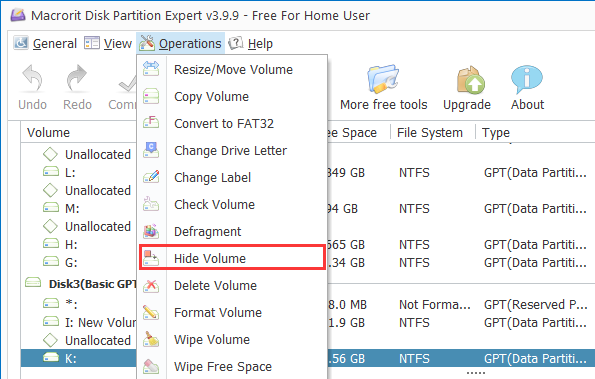
And there are five methods of hiding a volume
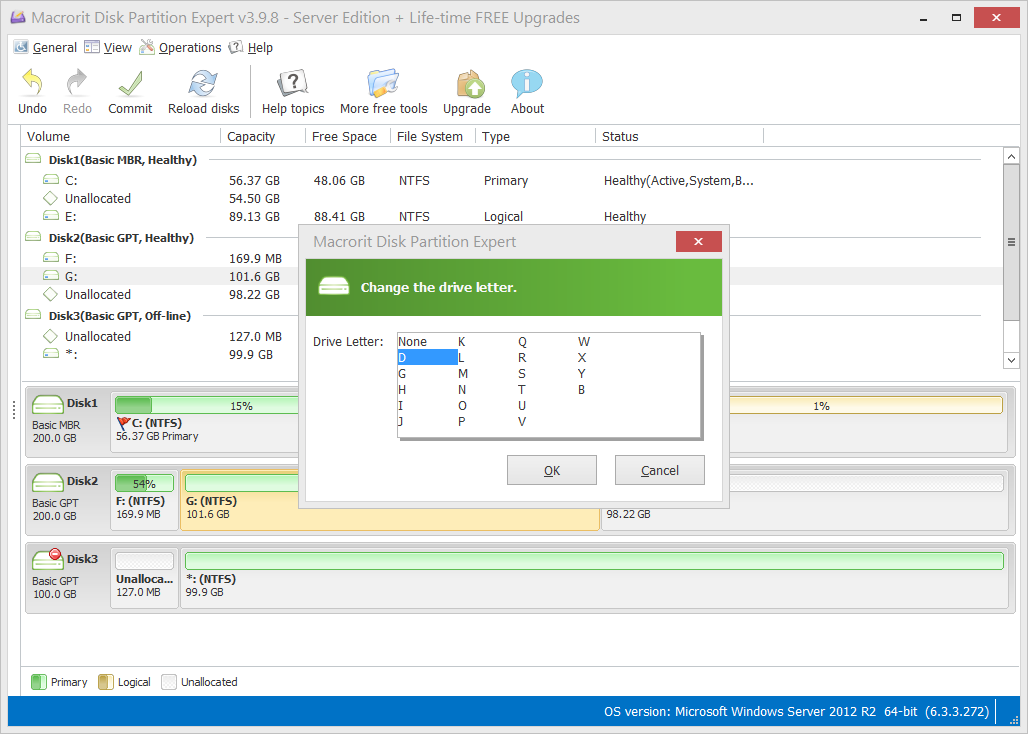
About case 2, change drive in VMware, both Disk Management and Partition Expert performs the same, differ in the interface, in Partition Expert, we change drive like this:
Erase or Format a volume to make data clean, or just Wipe a volume
In fact, Format is not Erase, nor Wipe
Format is more like to create a new file system (NTFS or FAT32) and make the partition ready for use, it indeed removes data, but that’s not the purpose, it’s main function is to create new, besides, formatted data can be easily picked up by any data recovery program unless we use the ‘Low-level’ format
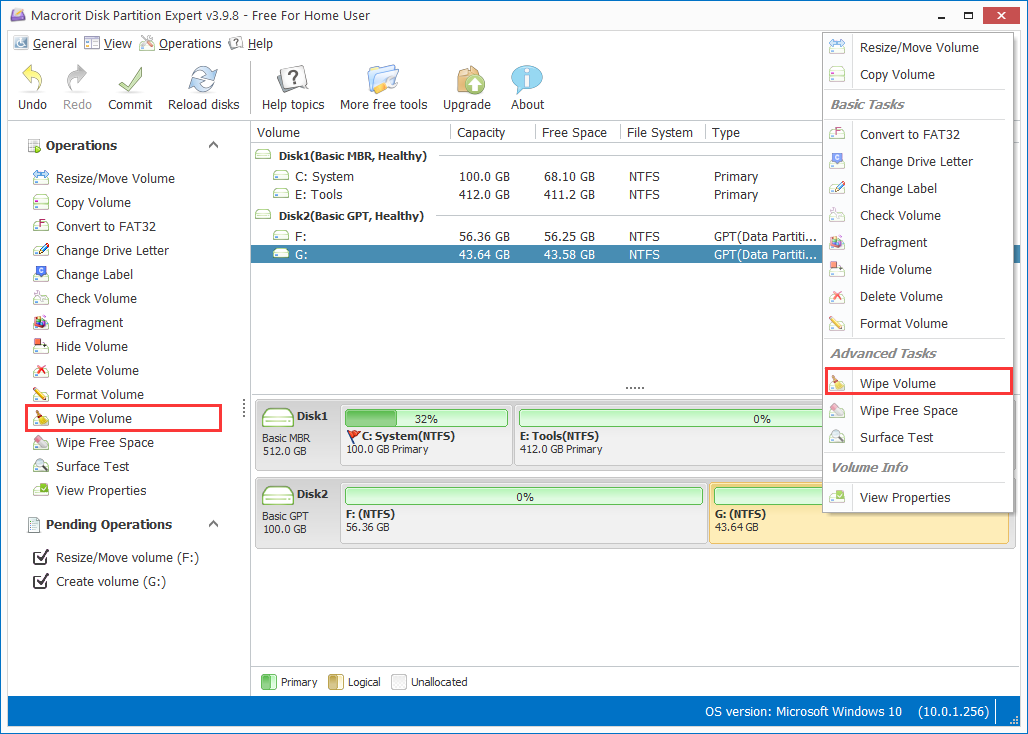
Erase and Wipe operations are more ‘data removing’ related, actually, they’re removing data by the means of overwriting sectors with meaning characters, 1, 0, and their combination, to be more specific
In Partition Expert, we can delete, format and even wipe a volume, and there are 5 built-in wiping methods, 3 or which are standard wiping plans on government and international rules
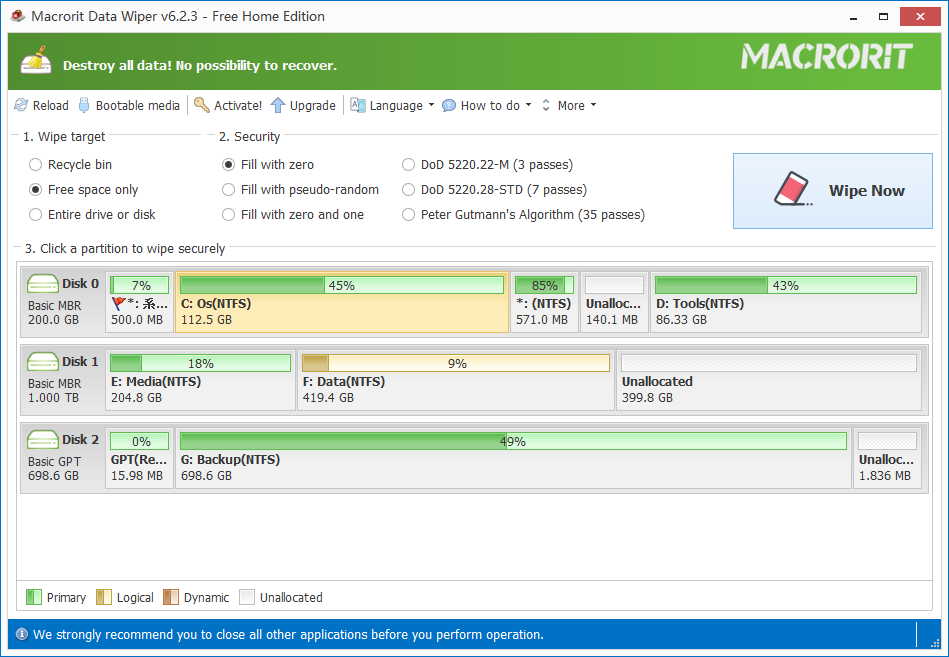
Data Wiper wipes everything
Speaking of wiping a volume, another product from us is the Macrorit Data Wiper, it not only is able to wipe a single volume, it also capable of:
- Wiping Recycle Bin
- Wiping Free Space
- Wiping Entire Disk
- Wiping Windows even when it’s running
And it has the ability to create bootable Data Wiper if you’d like to perform the wipe operation in WinPE, although you can do the same when Windows is working, besides, it has 6 kinds of wiping schemes instead of 5 in Partition Expert
Other Utilities